Quantcast
Channel: Basic Configuration – Labnario
Viewing all 11 articles
Browse latest View live

cheat sheet – huawei CLI

$
0
0
I have been describing Huawei datacom devices on my blog since July 2011. I started with some basic information about Huawei CLI, access methods and upgrade procedures. Then I showed you more advanced topics like PBR, DHCP etc. I am pleasantly surprised that this blog is visited by people from all continents, even from countries [...]

file system of NE40E

$
0
0
Download as PDF How to manage storage devices, directories and files on Huawei’s equipment? I will try to introduce the file system based on NE40E routers. NE40E, as most of carrier class Huawei’s devices, has two MPU boards. Each board is equipped with two CFcards. The first CFcard, inside the board, is used for storing [...]

basic NTP configuration on Huawei devices

$
0
0
Download as PDF Network Time Protocol (NTP) is one of the oldest Internet protocols. It is used for clock synchronization between computer systems over packet-switched data networks.  Because it was designed to operate in variable-latency environment, NTP can achieve up to 1 millisecond accuracy in local area networks and tens of milliseconds when running over [...]

VLAN, trunk, VLANIF (SVI) on Huawei switch

$
0
0
Download as PDF Today I want to show you: How to configure VLANs How to add interface to a VLAN How to establish 802.1q trunk between two Ethernet switches and filter VLANs How to configure VLANIF (VLAN interface or simply SVI). Look at the following topology. Let’s assume that we want to configure two switches, [...]

connection to ssh server by stelnet and sftp

$
0
0
Download as PDF Today I would like to focus on SSH application. What I want to do is to configure SSH connection between two switches, using password and RSA authentication: Connection between stelnet client and SSH server Connection between SFTP client and SSH server. Let’s look at the simple SSH topology: Ensure IP connection based [...]

a few basic but useful maintenance commands

$
0
0

labnario - Huawei From Scratch

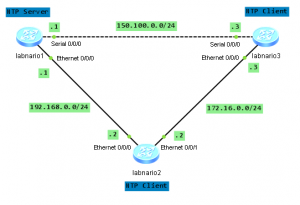
To make it easy to maintain Huawei’s device it is recommended to configure proper time. You can do it manually or configure NTP protocol to force the device to use reference time from external servers. I will also show you how to configure header for login information and how to execute the specified batch file.

Setting of time zone:
clock timezone time-zone-name { add | minus } offset

Let’s take Poland time zone as an example.

<NE40E>clock timezone labnario add 1
 Setting of daylight-saving-time:
clock daylight-saving-time time-zone-name repeating start-time { { { first | second | third | fourth | last } weekday month } | start-date } end-time { { { first | second | third | fourth | last } weekday month } | end-date } offset

Using the “clock daylight-saving-time” command, you can configure the name, start time and end time of the daylight saving time. Taking Poland as an exapmple we add 1 hour during summer time:

<NE40E>clock daylight-saving-time labnario repeating 02:00 last Sun Mar 03:00 last Sun Oct 01:00
Setting of actual time:
<NE40E>clock datetime 18:00 2011-11-03

You can display clock information using “display clock” command.

NTP external servers:

If you want to use external NTP servers, for time synchronization, you can configure them in the following way:

[NE40E]ntp-service unicast-server x.x.x.x source-interface interface name
[NE40E]ntp-service unicast-server y.y.y.y source-interface interface name

You can display status of NTP using “display ntp-service status” command.

I only showed you basic NTP configuration. More details you can find in specific product documentation.

Header login configuration:

You can configure header login information in the 2 ways:

As a text:

[NE40E]header login information "
Info:The banner text supports 220 characters max, including the start and the end character.If you want to enter more than this, use banner file instead.
Input banner text, and quit with the character '"':
****************************************

Authorised access only
This system is the property of LABNARIO
Disconnect IMMEDIATELY if you are not an authorised user!

****************************************
"
[NE40E]

Using a file stored in CF card:

[NE40E]header login file labnario.txt
Execute name.bat

Sometimes, instead of putting many commands in CLI, it is easier and faster to use batch file. You can create such batch (suffixed with “.bat”) file with a set of commands inside and then upload it to CF card by FTP. Then you can use “execute name.bat” command to start the file.

The post a few basic but useful maintenance commands appeared first on Labnario.

Huawei basic user environment

$
0
0

labnario - Huawei From Scratch

As you already know you can assign a different privilege level for each user, configured on a Huawei device. How to configure local user and how to access Huawei device you can read in one of my previous posts.

user privilege level

Today I want to focus on the privilege level of local user. Each year lots of accidents in IP networks are caused by inexperienced employees. We can decrease the number of such accidents setting privilege level for local users, logging into network devices. Setting a lower privilege level for such employees increases networks’ safety. For more experienced engineers  we can either configure higher privilege level or set a super password, to let them to perform advanced operation.

Let’s assume that we have created a local user with the lowest priority:

#
local-user labnario password cipher &EU15O"Q3/;Q=^Q`MAF4<1!!
 local-user labnario service-type telnet
 local-user labnario level 0
#

After you are logged as user “labnario” and putting a question mark you can see all commands available in level 0:

<CX600>?
User view commands:
  cluster        Run cluster command
  display        Display LPUF-10 work-mode
  hwtacacs-user  HWTACACS user
  language-mode  Specify the language environment
  local-user     Local user
  ping           Ping function
  quit           Exit from current command view
  return         Exit to user view
  save           Save file
  super          Privilege current user a specified priority level
  telnet         Establish a Telnet connection
  trace          Trace route (switch) to host on Data Link Layer
  tracert        Trace route to host

As this is the lowest privilege level we cannot even display current-configuration and interfaces’ statistics:

<CX600>display current-configuration
             ^
Error: Unrecognized command found at '^' position.

<CX600>display interface GigabitEthernet7/0/0
             ^
Error: Unrecognized command found at '^' position.
command privilege level

But we can assign additional commands to this level in advance, as needed:

#
command-privilege level 0 view shell display current-configuration
command-privilege level 0 view system display current-configuration
command-privilege level 0 view shell display interface GigabitEthernet7/0/0
#

Now it is possible to display current-configuration and statistics of GE7/0/0:

<CX600>display ?
  current-configuration     Current configuration
  interface                 Status and configuration information for the
                            interface
super password and switching user levels

Let’s come back to super password. What we want to do is to the set super password, in advance, for privilege level 15:

[CX600]super password level 15 cipher &EU15O"Q3/;Q=^Q`MAF4<1!!

And now if you are logged as level 0 user, you can switch to level 15. If you want to recall about a level’s arrangement on Huawei devices you can read huawei cli introduction.

<CX600>super 15
Password:
Now user privilege is 15 level, and only those commands whose level is equal to or less than this level can be used.
Privilege note: 0-VISIT, 1-MONITOR, 2-SYSTEM, 3-MANAGE

Now you have full rights to configure and manage this device.

locking user terminal

Remember to lock your current user terminal interface if you are away of your desk. It prevents your device against unauthorized users operations on the current terminal interface:

<CX600>lock
Enter Password:
Confirm Password:

Info: The terminal is locked.

Enter Password:
<CX600>

The post Huawei basic user environment appeared first on Labnario.

from Huawei CLI – reset saved-configuration

$
0
0

labnario - Huawei From Scratch

reset saved-configuration

If you need to reconfigure a Huawei device and do not want to delete its configuration line by line, it is the fastest way to restore the device to the default configuration. Reset saved-configuration command does not delete the existing configuration file in storage device. It is required to restart the device to activate changes. Before reboot, the device compares the configuration file to be loaded at the next startup and existing file to be deleted. Finally the device:

  • loads the default configuration if both files are the same
  • deletes the configuration file in use if they are different
  • displays a message indicating that the configuration file does not exist if the configuration file to be deleted does not exist
<labnario> reset saved-configuration
The action will delete the saved configuration in the device.
The configuration will be erased to reconfigure. Continue? [Y/N]: y

Which configuration file is set as the “next startup saved-configuration file” you can check by the following command:

<labnario> display startup
MainBoard:
  Configured startup system software:        cfcard:/v600r002c03spc100.cc
  Startup system software:                   cfcard:/v600r002c03spc100.cc
  Next startup system software:              cfcard:/v600r002c03spc100.cc
  Startup saved-configuration file:          cfcard:/labnario.cfg
  Next startup saved-configuration file:     cfcard:/labnario.cfg
  Startup paf file:                          cfcard:/paf.txt
  Next startup paf file:                     cfcard:/paf.txt
  Startup license file:                      cfcard:/license.txt
  Next startup license file:                 cfcard:/license.txt
  Startup patch package:                     cfcard:/patch.pat
  Next startup patch package:                cfcard:/patch.pat
SlaveBoard:
  Configured startup system software:        cfcard:/v600r002c03spc100.cc
  Startup system software:                   cfcard:/v600r002c03spc100.cc
  Next startup system software:              cfcard:/v600r002c03spc100.cc
  Startup saved-configuration file:          cfcard:/labnario.cfg
  Next startup saved-configuration file:     cfcard:/labnario.cfg
  Startup paf file:                          cfcard:/paf.txt
  Next startup paf file:                     cfcard:/paf.txt
  Startup license file:                      cfcard:/license.txt
  Next startup license file:                 cfcard:/license.txt
  Startup patch package:                     cfcard:/patch.pat
  Next startup patch package:                cfcard:/patch.pat

The post from Huawei CLI – reset saved-configuration appeared first on Labnario.


file system of Huawei NE40E

$
0
0

labnario - Huawei From Scratch

How to manage storage devices, directories and files on Huawei’s equipment?

I will try to introduce the file system based on NE40E routers.

NE40E, as most of carrier class Huawei’s devices, has two MPU boards. Each board is equipped with two CFcards. The first CFcard, inside the board, is used for storing software and configuration’s files. The second one, at the front panel of the board, stores log files. Some of Huawei’s devices use flash memory to store all necessary files.

The file system manages files and directories in the storage device by creating, deleting, modifying, renaming files or directories and displaying contents of the files.

Let’s do an example:

  1. Create labnario and huawei directories in CFcard.
  2. Copy log.log file from CFcard2 to labnario directory.
  3. Display this file.
  4. Rename this file with old_log.log.
  5. Compress it.
  6. Move old_log.log.zip file to huawei directory of the same CFcard.
  7. Delete this file from huawei directory.
  8. Restore the deleted file.
  9. Delete this file permanently.
  10. Delete huawei directory.

Display files stored in CFcard:

<NE40E>dir
Directory of cfcard:/

  Idx  Attr     Size(Byte)  Date        Time(LMT)  FileName 
    0  -rw-              0  Aug 08 2011 14:47:00   snmpnotilog.txt
    1  -rw-    247,575,224  Aug 08 2011 14:55:58   ne40e80ev6r1c00spc900.cc
    2  -rw-     37,289,817  Aug 08 2011 14:57:20   patch-v6r1spc020.pat
    3  -rw-         14,725  Sep 16 2011 11:02:28   license.txt
    4  -rw-         86,875  Sep 16 2011 11:03:10   paf.txt
    5  -rw-              0  Oct 18 2011 14:57:34   vrpcfg.cfg

Create two directories:

<NE40E>mkdir cfcard:/labnario
Info: Create directory cfcard:/labnario......Done.
<NE40E>mkdir cfcard:/huawei
Info: Create directory cfcard:/huawei......Done.

<NE40E>dir
Directory of cfcard:/

  Idx  Attr     Size(Byte)  Date        Time(LMT)  FileName 
    0  drw-              -  Apr 30 2012 14:48:18   labnario
    1  drw-              -  Apr 30 2012 14:51:08   huawei
    2  -rw-              0  Aug 08 2011 14:47:00   snmpnotilog.txt
    3  -rw-    247,575,224  Aug 08 2011 14:55:58   ne40e80ev6r1c00spc900.cc
    4  -rw-     37,289,817  Aug 08 2011 14:57:20   patch-v6r1spc020.pat
    5  -rw-         14,725  Sep 16 2011 11:02:28   license.txt
    6  -rw-         86,875  Sep 16 2011 11:03:10   paf.txt
    7  -rw-              0  Oct 18 2011 14:57:34   vrpcfg.cfg

Copy log.log file from CFcard2 to labnario directory of CFcard:

<NE40E>copy cfcard2:/log/log.log cfcard:/labnario
Copy cfcard2:/log/log.log to cfcard:/labnario/log.log?[Y/N]:y
\
Info: Copied file cfcard2:/log/log.log to cfcard:/labnario/log.log...Done.
<NE40E>cd labnario
<NE40E>pwd
cfcard:/labnario

<NE40E>dir
Directory of cfcard:/labnario/

  Idx  Attr     Size(Byte)  Date        Time(LMT)  FileName 
    0  -rw-        588,992  Apr 30 2012 14:46:50   log.log

1,022,848 KB total (414,016 KB free)

Rename this file:

<NE40E>rename cfcard:/labnario/log.log cfcard:/labnario/old_log.log
Rename cfcard:/labnario/log.log to cfcard:/labnario/old_log.log ?[Y/N]:y
Info: Rename file cfcard:/labnario/log.log to cfcard:/labnario/old_log.log ......Done.

<NE40E>dir
Directory of cfcard:/labnario/

  Idx  Attr     Size(Byte)  Date        Time(LMT)  FileName 
    0  -rw-        588,992  Apr 30 2012 14:46:50   old_log.log

1,022,848 KB total (414,016 KB free)

Display old_log.log file:

<NE40E>more old_log.log 

################################################################
#Automatic record log end,current health information as follows:
Slot                    CPU Usage     Memory Usage (Used/Total)
---------------------------------------------------------------
9       MPU(System Master) 11%           19%  361MB/1877MB
1       LPU                12%           40%  130MB/319MB
2       LPU                11%           45%  145MB/319MB
3       LPU                11%           45%  145MB/319MB
10      MPU                 7%           17%  320MB/1877MB
#DateTime Stamp: 2012-01-25 10:15:27.100
################################################################

Jan 25 2012 10:25:05 NE40E SRM_BASE/1/ENTITYINSERT: OID 1.3.6.1.4.1.2011.5.25.129.2.1.2 Physical entity is inserted. (EntityPhysicalIndex=16842767, BaseTrapSeverity=4, BaseTrapProbableCause=65541, BaseTrapEventType=5, EntPhysicalContainedIn=16842757, EntPhysicalName="GigabitEthernet1/0/9")
Jan 25 2012 10:25:06 NE40E %%01PHY/4/PHY_SFP_XFP_OK(l)[2082]:Slot=1;GigabitEthernet1/0/9 SFP/XFP is present.
Jan 25 2012 10:27:14 NE40E %%01SRM/2/NODEFAULT(l)[2083]:Slot=1;PIC0 of LPU1 is failed, perhaps Low Rx Pow ALM of SFP9 ALARM is abnormal. (Reason="EAGF0 ESFP RX power low alarm, Current Rxpower is -40.00dBm. ")
Jan 25 2012 10:29:55 NE40E %%01SRM/2/NODERESUME(l)[2084]:Slot=2;OTHER of LPU2: branch 2 of 48vPOWER resumed.
Jan 25 2012 10:29:56 NE40E %%01SRM/2/NODEFAULT(l)[2085]:Slot=2;OTHER of LPU2 is failed, perhaps branch 2 of 48vPOWER is abnormal. (Reason="second branch abnormal")
Jan 25 2012 10:29:57 NE40E %%01SRM/2/NODERESUME(l)[2086]:Slot=2;OTHER of LPU2: branch 2 of 48vPOWER resumed.

Compress this file:

<NE40E>zip cfcard:/labnario/old_log.log cfcard:/labnario/old_log.log.zip
Compress cfcard:/labnario/old_log.log  to cfcard:/labnario/old_log.log.zip?[Y/N]:y
%Compressed file cfcard:/labnario/old_log.log cfcard:/labnario/old_log.log.zip.

<NE40E>dir
Directory of cfcard:/labnario/

  Idx  Attr     Size(Byte)  Date        Time(LMT)  FileName 
    0  -rw-        588,992  Apr 30 2012 14:46:50   old_log.log
    1  -rw-         47,918  Apr 30 2012 14:48:20   old_log.log.zip

1,022,848 KB total (413,968 KB free)

Move the zipped file to huawei directory:

<NE40E>move cfcard:/labnario/old_log.log.zip cfcard:/huawei
Move cfcard:/labnario/old_log.log.zip to cfcard:/huawei/old_log.log.zip ?[Y/N]:y
%Moved file cfcard:/labnario/old_log.log.zip to cfcard:/huawei/old_log.log.zip.

<NE40E>dir
Directory of cfcard:/labnario/

  Idx  Attr     Size(Byte)  Date        Time(LMT)  FileName 
    0  -rw-        588,992  Apr 30 2012 14:46:50   old_log.log

1,022,848 KB total (413,952 KB free)

<NE40E>cd cfcard:/huawei
<NE40E>dir
Directory of cfcard:/huawei/

  Idx  Attr     Size(Byte)  Date        Time(LMT)  FileName 
    0  -rw-         47,918  Apr 30 2012 14:48:20   old_log.log.zip

1,022,848 KB total (413,952 KB free)

Delete this file from huawei directory (actually move to recycle bin):

<NE40E>delete old_log.log.zip 
Delete cfcard:/huawei/old_log.log.zip?[Y/N]:y
Info: Deleting file cfcard:/huawei/old_log.log.zip...succeeded.

<NE40E>dir /all
Directory of *

    0  -rw-         47,918  Apr 30 2012 14:48:18  [old_log.log.zip]

1,022,848 KB total (413,936 KB free)

<NE40E>dir
Info: File can't be found in the directory.
1,022,848 KB total (413,936 KB free)

Restore the deleted file from recycle bin:

<NE40E>undelete old_log.log.zip 
Undelete cfcard:/huawei/old_log.log.zip?[Y/N]:y
%Undeleted file cfcard:/huawei/old_log.log.zip.

<NE40E>dir
Directory of cfcard:/huawei/

  Idx  Attr     Size(Byte)  Date        Time(LMT)  FileName 
    0  -rw-         47,918  Apr 30 2012 14:48:20   old_log.log.zip

1,022,848 KB total (413,936 KB free)

Delete this file permanently:

<NE40E>delete /unreserved old_log.log.zip 
Warning: The contents of file cfcard:/huawei/old_log.log.zip cannot be recycled. Continue? [Y/N]:y
Info: Deleting file cfcard:/huawei/old_log.log.zip...succeeded.

How to make recycle-bin empty go to “reset recycle-bin”.

Delete huawei directory:

<NE40E>cd cfcard:
<NE40E>rmdir cfcard:/huawei
Remove directory cfcard:/huawei?[Y/N]:y
%Removing directory cfcard:/huawei...Done!

The post file system of Huawei NE40E appeared first on Labnario.

basic NTP configuration on Huawei devices

$
0
0

labnario - Huawei From Scratch

Network Time Protocol (NTP) is one of the oldest Internet protocols. It is used for clock synchronization between computer systems over packet-switched data networks.  Because it was designed to operate in variable-latency environment, NTP can achieve up to 1 millisecond accuracy in local area networks and tens of milliseconds when running over the Internet. NTP can be a very useful tool especially, when we want to correlate issues during network failures.

It is important to remember that NTP uses hierarchical system of levels of clock sources, which is called a stratum.

At the top of this hierarchy we have a stratum-0 devices, which act as a reference clocks. These are usually atomic clocks which has little or no delay associated with it. The reference clock typically synchronizes to the correct time (UTC) using GPS, Irig-B, etc.

Devices which are directly connected (usually via RS-232, not over a network path) to the stratum-0 servers are called stratum-1 servers. Stratum-2 server is connected to the stratum-1 server over a network path. Thus, a stratum-2 server gets its time via NTP protocol from a stratum-1 server. A stratum-3 server gets its time via NTP from stratum-2 server, and so on.

So the stratum level simply defines its distance from the reference clock.

How to configure NTP on Huawei devices?

Look at the lab topology:

We want to configure our devices:

  • Labnario1 router to be the NTP Server with the stratum being 2.
  • Labnario2 router to be the NTP Client of labnario1.
  • Labnario3 router to be the NTP Client of labnario1. In case of the serial link failure, Labnario3 should synchronize its clock with labnario2.

Let’s start with labnario1:

[labnario1]display ntp-service status
 clock status: synchronized 
 clock stratum: 2 
 reference clock ID: LOCAL(0)
 nominal frequency: 64.0000 Hz 
 actual frequency: 64.0000 Hz 
 clock precision: 2^7
 clock offset: 0.0000 ms 
 root delay: 0.00 ms 
 root dispersion: 26.49 ms 
 peer dispersion: 10.00 ms 
 reference time: 19:09:07.422 UTC Nov 11 2012(D44A7653.6C189374)
 synchronization state: clock synchronized

Now we can configure labnario2 to be the NTP client of labnario1:

[labnario2]ntp-service unicast-server 192.168.0.1

[labnario2]display ntp-service status
 clock status: synchronized 
 clock stratum: 3 
 reference clock ID: 192.168.0.1
 nominal frequency: 64.0000 Hz 
 actual frequency: 64.0000 Hz 
 clock precision: 2^7
 clock offset: 7.6511 ms 
 root delay: 15.63 ms 
 root dispersion: 75.03 ms 
 peer dispersion: 34.30 ms 
 reference time: 19:11:28.156 UTC Nov 11 2012(D44A76E0.28189374)
 synchronization state: clock synchronized

As you can see, labnario2 treats labnario1 as a reference clock and has a clock stratum of 3. This means that it is one level below labnario1 in the NTP hierarchy. Let’s look how this association works.

This type of association is created upon arrival of a client request message and exists only in order to reply to the request, after which the association is dissolved. Labnario2 is in client mode in its association with labnario1.

Let’s configure labnario3:

[labnario3]ntp-service unicast-server 150.100.0.1
[labnario3]ntp-service unicast-peer 172.16.0.2

[labnario3]display ntp-service status
 clock status: synchronized 
 clock stratum: 3 
 reference clock ID: 150.100.0.1
 nominal frequency: 64.0000 Hz 
 actual frequency: 64.0000 Hz 
 clock precision: 2^7
 clock offset: 6.8659 ms 
 root delay: 15.63 ms 
 root dispersion: 62.00 ms 
 peer dispersion: 34.29 ms 
 reference time: 19:16:58.312 UTC Nov 11 2012(D44A782A.50189374)
 synchronization state: clock synchronized

Labnario3 is now synchronized with labnario1. Let’s check what happens when labnario3 looses its connectivity with labnario1. To do this, I want to remove IP address configuration from serial interface of labnario1.

[labnario1]int s0/0/0
[labnario1-Serial0/0/0]undo ip address
[labnario1-Serial0/0/0]

Let’s check clock synchronization on labnario3 again:

Nov 11 2012 20:28:42-08:00 labnario3 %%01NTP/4/SOURCE_LOST(l)[0]:System synchronization source lost. (SourceAddress=150.100.0.1, Reason=Clock selection failed - no selectable clock)

Nov 11 2012 20:29:27-08:00 labnario3 %%01NTP/4/PEER_SELE(l)[1]:The peer selected by the system is 172.16.0.2.

Nov 11 2012 20:29:27-08:00 labnario3 %%01NTP/4/STRATUM_CHANGE(l)[3]:System stratum changes from 16 to 4. (SourceAddress=172.16.0.2)

[labnario3]display ntp-service status
 clock status: synchronized 
 clock stratum: 4 
 reference clock ID: 172.16.0.2
 nominal frequency: 64.0000 Hz 
 actual frequency: 64.0000 Hz 
 clock precision: 2^7
 clock offset: 0.0000 ms 
 root delay: 15.63 ms 
 root dispersion: 107.43 ms 
 peer dispersion: 80.96 ms 
 reference time: 19:34:48.922 UTC Nov 11 2012(D44A7C58.EC189374)
 synchronization state: clock synchronized

Now labnario3 takes its time from labnario2. As a result, clock stratum has changed to 4. This is because now we have one hop count more to labnario1 after topology change.

Let’s look at the association between labnario3 and labnario2 a little bit closer. Labnario3 is now configured in symmetric active mode and labnario2 acts as a symmetric passive. Command ntp-service unicast-peer can be entered on either side of this association (but not on both sides). This is because Huawei devices are in NTP symmetric passive mode by default. Look at the packet capture how labnario3 exchanges NTP packets with labnario2:

Let’s bring serial connectivity between labnario1 and labnario3 back up and check labnario3 again:

Nov 11 2012 20:43:52-08:00 labnario3 %%01NTP/4/PEER_SELE(l)[4]:The peer selected by the system is 150.100.0.1.
Nov 11 2012 20:43:52-08:00 labnario3 %%01NTP/4/STRATUM_CHANGE(l)[5]:System stratum changes from 4 to 3. (SourceAddress=150.100.0.1)

[labnario3]display ntp-service status 
 clock status: synchronized 
 clock stratum: 3 
 reference clock ID: 150.100.0.1
 nominal frequency: 64.0000 Hz 
 actual frequency: 64.0000 Hz 
 clock precision: 2^7
 clock offset: 7.7026 ms 
 root delay: 15.63 ms 
 root dispersion: 55.84 ms 
 peer dispersion: 34.30 ms 
 reference time: 19:44:58.859 UTC Nov 11 2012(D44A7EBA.DC189374)
 synchronization state: clock synchronized

Labnario3 now synchronizes its clock with labnario1 again with a clock stratum of 3.

For NTP troubleshooting use the following commands:

<labnario3>debugging ntp-service ?
  access           Access control debugging functions
  adjustment       Clock adjustment debugging functions
  all              All debugging functions
  authentication   Identity authentication debugging functions
  event            Event debugging functions
  filter           Loop filtering information debugging functions
  packet           Packet debugging functions
  parameter        Clock parameter debugging functions
  refclock         Reference clock debugging functions
  selection        Clock selection information debugging functions
  synchronization  Clock synchronization information debugging functions
  validity         Validity test debugging functions

The post basic NTP configuration on Huawei devices appeared first on Labnario.

connection to ssh server by stelnet and sftp

$
0
0

labnario - Huawei From Scratch

Today I would like to focus on SSH application. What I want to do is to configure SSH connection between two switches, using password and RSA authentication:

  • Connection between stelnet client and SSH server
  • Connection between SFTP client and SSH server.

Let’s look at the simple SSH topology:

Ensure IP connection based on the above topology:

#
sysname SSH_client
#
vlan batch 100
#
interface Vlanif100
 ip address 10.0.0.1 255.255.255.0
#
interface GigabitEthernet0/0/1
 port hybrid tagged vlan 100
#
sysname SSH_server
#
vlan batch 100
#
interface Vlanif100
 ip address 10.0.0.2 255.255.255.0
#
interface GigabitEthernet0/0/1
 port hybrid tagged vlan 100

Create a local key pair on the SSH_server:

[SSH_server]rsa local-key-pair create 
The key name will be: SSH_server_Host
The range of public key size is (512 ~ 2048). 
NOTES: If the key modulus is greater than 512, 
       it will take a few minutes.
Input the bits in the modulus[default = 512]:
Generating keys...
....................++++++++++++
...........++++++++++++
.........++++++++
........................++++++++

Configure a VTY user-interface:

[SSH_server]user-interface vty 0 4
[SSH_server-ui-vty0-4]authentication-mode aaa	
[SSH_server-ui-vty0-4]protocol inbound ssh

Configure two local users:

[SSH_server-aaa]local-user labnario_pass password simple labnario
Info: Add a new user.
[SSH_server-aaa]local-user labnario_pass service-type ssh
[SSH_server-aaa]local-user labnario_pass privilege level 15
[SSH_server-aaa]
[SSH_server-aaa]local-user labnario_rsa password cipher labnario
Info: Add a new user.
[SSH_server-aaa]local-user labnario_rsa service-type ssh
[SSH_server-aaa]local-user labnario_rsa privilege level 15

Create an SSH user named labnario_pass and configure the authentication mode as password for the user:

[SSH_server]ssh user labnario_pass authentication-type password
Info: Succeeded in adding a new SSH user.

Create an SSH user named labnario_rsa and configure the authentication mode as RSA for the user:

[SSH_server]ssh user labnario_rsa authentication-type rsa 
Info: Succeeded in adding a new SSH user.

Create a local key pair on the client:

[SSH_client]rsa local-key-pair create 
The key name will be: SSH_client_Host
The range of public key size is (512 ~ 2048). 
NOTES: If the key modulus is greater than 512, 
       it will take a few minutes.
Input the bits in the modulus[default = 512]:
Generating keys...
...++++++++++++
.............++++++++++++
.........++++++++
...................++++++++

Send the RSA public key, generated on the client, to the server:

[SSH_client]display rsa local-key-pair public 

=====================================================
Time of Key pair created: 12:14:00  2013/3/4
Key name: SSH_client_Host
Key type: RSA encryption Key
=====================================================
Key code:
3047
  0240
    E3A7DD2A 41619DB8 87C393E6 37F8EC7F FE3CCC99
    648127E9 5CB55853 682B6769 6A1A29AC F14C4B6C
    BB42D341 FFACE436 72629F6D 83BA629D 820EB648
    FED5D523 
  0203
    010001
...

[SSH_server]rsa peer-public-key labnario 
Enter "RSA public key" view, return system view with "peer-public-key end".	
[SSH_server-rsa-public-key]public-key-code begin 
Enter "RSA key code" view, return last view with "public-key-code end".

[SSH_server-rsa-key-code]3047
[SSH_server-rsa-key-code]  0240
[SSH_server-rsa-key-code]    E3A7DD2A 41619DB8 87C393E6 37F8EC7F FE3CCC99
[SSH_server-rsa-key-code]    648127E9 5CB55853 682B6769 6A1A29AC F14C4B6C
[SSH_server-rsa-key-code]    BB42D341 FFACE436 72629F6D 83BA629D 820EB648
[SSH_server-rsa-key-code]    FED5D523 
[SSH_server-rsa-key-code]  0203
[SSH_server-rsa-key-code]    010001	
[SSH_server-rsa-key-code]public-key-code end
[SSH_server-rsa-public-key]peer-public-key end

Bind the RSA public key of the SSH_client to labnario_rsa on the SSH_server:

[SSH_server]ssh user labnario_rsa assign rsa-key labnario

Enable stelnet service on the SSH server:

[SSH_server]stelnet server enable
Info: Succeeded in starting the Stelnet server.

Set the service type of labnario_pass and labnario_rsa to stelnet:

[SSH_server]ssh user labnario_pass service-type stelnet
[SSH_server]ssh user labnario_rsa service-type stelnet

You must enable the initial authentication on the SSH_client for the first login:

[SSH_client] ssh client first-time enable

Initiate stelnet connection from SSH_client to SSH_server using password:

[SSH_client]stelnet 10.0.0.2
Please input the username:labnario_pass
Trying 10.0.0.2 ...
Press CTRL+K to abort
Connected to 10.0.0.2 ...
The server is not authenticated. Continue to access it? [Y/N] :y
Save the server's public key? [Y/N] :y
The server's public key will be saved with the name 10.0.0.2. Please wait...

Enter password:
Info: The max number of VTY users is 5, and the number
      of current VTY users on line is 1.
      The current login time is 2013-03-04 12:22:52.
<SSH_server>

Initiate stelnet connection from SSH_client to SSH_server using RSA:

[SSH_client]stelnet 10.0.0.2
Please input the username:labnario_rsa
Trying 10.0.0.2 ...
Press CTRL+K to abort
Connected to 10.0.0.2 ...
Info: The max number of VTY users is 5, and the number
      of current VTY users on line is 1.
      The current login time is 2013-03-04 12:23:10.
<SSH_server>

To use SFTP to connect to SSH_server just add the following configuration to SSH_server:

[SSH_server-aaa]local-user labnario_pass service-type ftp ssh
[SSH_server-aaa]local-user labnario_rsa service-type ftp ssh
[SSH_server-aaa]local-user labnario_pass ftp-directory flash:
[SSH_server-aaa]local-user labnario_rsa ftp-directory flash:

[SSH_server]ssh user labnario_pass service-type all
[SSH_server]ssh user labnario_rsa service-type all

[SSH_server]sftp server enable
Info: Succeeded in starting the SFTP server.

Use SFTP on SSH_client to initiate SFTP connection to SSH_server:

[SSH_client]sftp 10.0.0.2
Please input the username:labnario_pass
Trying 10.0.0.2 ...
Press CTRL+K to abort
Connected to 10.0.0.2 ...
Enter password:
<sftp-client>dir
drwxrwxrwx   1 noone    nogroup         0 Mar 04 12:04 src
drwxrwxrwx   1 noone    nogroup         0 Mar 04 12:05 compatible
-rwxrwxrwx   1 noone    nogroup       890 Mar 04 12:23 vrpcfg.zip
<sftp-client>quit
Bye
[SSH_client]
[SSH_client]
[SSH_client]sftp 10.0.0.2
Please input the username:labnario_rsa
Trying 10.0.0.2 ...
Press CTRL+K to abort
Connected to 10.0.0.2 ...
<sftp-client>dir
drwxrwxrwx   1 noone    nogroup         0 Mar 04 12:04 src
drwxrwxrwx   1 noone    nogroup         0 Mar 04 12:05 compatible
-rwxrwxrwx   1 noone    nogroup       890 Mar 04 12:23 vrpcfg.zip
<sftp-client>quit
Bye

The post connection to ssh server by stelnet and sftp appeared first on Labnario.

Viewing all 11 articles
Browse latest View live